
Composting Toilets made from Wheelie Bins
I just read a post on composting toilets on the Permaculture Research Institute and remembered that I never posted about the composting toilets I made last year (for various projects) based on a similar principles, but a distinct design. Below I offer a few words of introduction and then post photos of the building process with instructions.
As part of various projects that I’ve helped organise over the last six months, I self-appointed myself the maker of composting toilets. Some people might have been happy to delegate such a job to others, but I wasn’t that generous to my collaborators. I wanted the job for myself, and in this post I briefly describe the process with pictures and a few notes.
Before getting to the building process, let me tell you why I find composting toilets interesting and important. First of all, in a world where two and half billion people still lack regular access to clean drinking water, defecating into drinking quality water strikes me as the height of insanity. Obviously, most of us have no existing alternative. But that doesn’t change the insanity of our current system. Composting toilets provide an alternative. Not only do they avoid the need to defecate into drinking quality water, they require almost no water at all.
The second reason composting toilets are important relates to energy. Existing sewerage systems require a huge amount of energy to create and operate; composting toilets require very little energy, and can even be made from recycled materials (as I did, for the most part). Furthermore, most fertilisers require fossil energy to be produced. But not home made compost; it is fertiliser.
The overconsumption of fossil energy lies at the heart of the some of the world’s greatest problems at the moment, so we clearly have an incentive to reduce energy consumption wherever possible. Rather than importing energy intensive fertilisers and create energy intensive infrastructure, why not compost the organic matter we produce through our digestive system everyday?
At this stage some people will be wondering about the safety of composting toilets, especially using the compost (or ‘humanure’) as a fertiliser. I will not summarise the science now, but instead refer you to the master, for there is no better source than the Humanure Handbook, by Joseph Jenkins. Read this before creating your own system. For decades Jenkins has been rigorously studying composting toilet systems, and his scientific experience shows that, when they are done properly, composting toilets are safe. The biological processes that take place when composting human waste kills harmful pathogens, making the end product safe for use as a fertiliser. This biological process can be complete in as little as three months, but to be safe, I’d let it sit for a year.
I would not recommend using the compost near or on vegetable gardens (although, to be clear, when it has composted properly it is safe to do so). But humanure is ideal for fruit or nut trees or for non-edibles. Of course, it is important to take care when dealing with human waste, so do your own research and check regulations before you begin. But just as there are some (limited) risks to composting human waste, there are also risks to not composting (such as causing climate change through superfluous energy consumption!). We need to rethink our relationship to energy (and water) consumption, and composting toilets provide one aspect of our lives that deserves attention.
As I was researching this subject, a friend told me about an old Chinese custom related to composting toilets. Apparently, if you were invited to someone’s house for dinner, it was considered rude not to use their toilet before you left. The reasoning behind this seemingly strange custom was that, if someone is good enough to feed you, the least you could do is leave them the surplus nutrients via their composting toilet system. Interesting how times have changed. The past has much to teach us, especially if infused wisely with the present.
The following method includes a tap to allow liquids to be drained, and a ‘false bottom’ to keep the solids above the tap line. Take care with the liquids however as they’ll likely have traces of faecal matter. One option is to dig a hole 400mm deep, drain when necessary, and cover with earth or mulch. The solid waste (poo) in the bin won’t compost if it is sitting in liquids (pee), although it does need some moisture to support the biological processes. This system composts human waste by mixing it with so-called ‘brown matter’ or ‘carbon’, like straw, dry leaves, or paper, which must be added by the handful each time the loo is used. If the loo ever stinks – it won’t stink if it’s working properly, but if it does – this tends to mean you either need to add more carbon or drain the liquids.
Basic Materials:
1 second-hand wheelie bin
One tap
Drill with appropriate pieces
1 used bread crate
Several screws
Some ag pipe
Plywood
Wire mesh or shade cloth (I used mosquito netting from the salvage yard)
Recycled wood
Toilet seat
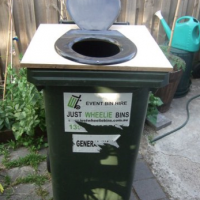
Begin with a wheelie bin:

First thing to do is drill a hole about 10cm from the base, at the front.
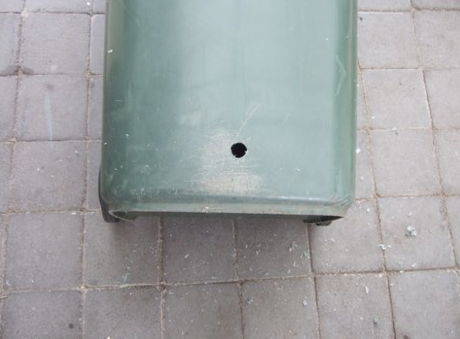
To do so, I used the drill piece shown below.

You want to get a size that right for your tap, so that that tap has to wind itself in.
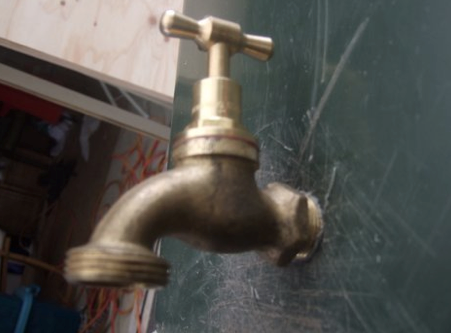
You will see in the picture of the tap that I haven’t wound it all the way in. Leave a little room for silicon. When the silicon is dry, wind it in properly, and to be safe, do another round of silicon. I was advised to do this by the guy at the hardware store, but aren’t sure it is necessary. You may just want to wind it in fully first go and do round lot of silicon.
You may also want to ensure that only liquids ever get into the tap, so I took the precaution of adding a mesh to the inside.
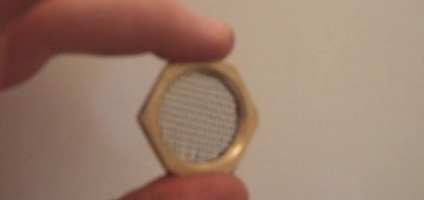
You also want to silicon that too (same way as with the tap).
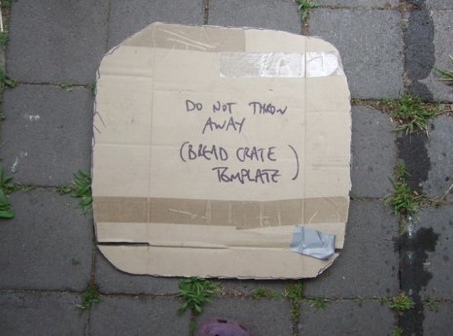
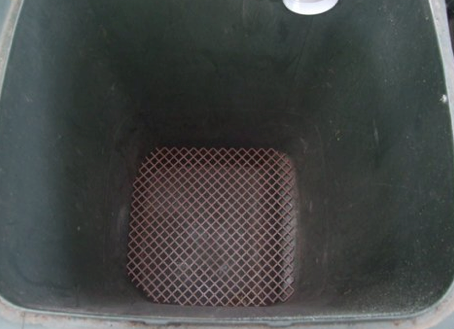
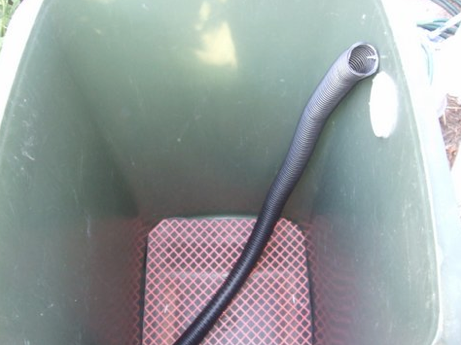
Now you need to create a false bottom to the wheelie bin by cutting out the appropriate size. I used a bread crate, which I picked up from the tip shop.
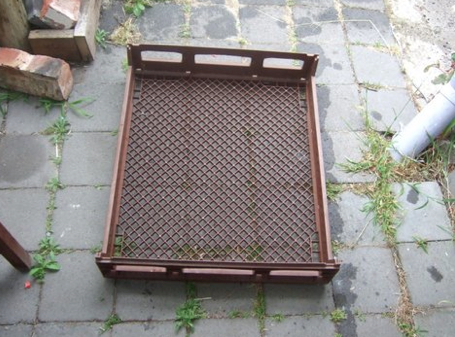
You need to cut it to size with a hacksaw or jigsaw. Fortunately I had a template provided by a friend.
Once you’ve cut it to size, wrap some mostiquo netting or shade cloth over it and attached with small bits of wire.

You then need to attach some wood to the sides of this to keep it off the bottom of the bin.

Then place it in the bottom of the bin.
You then want to add an air hole at the top. I used the thing below, but you could just cut a hole and attach shade cloth over the top. It needs to have a mesh, otherwise flies will get in. This allows you to attach piping to create air vent if in enclosed spaces (you can even put a little fan in the piping to suck air out of toilet through pipe.
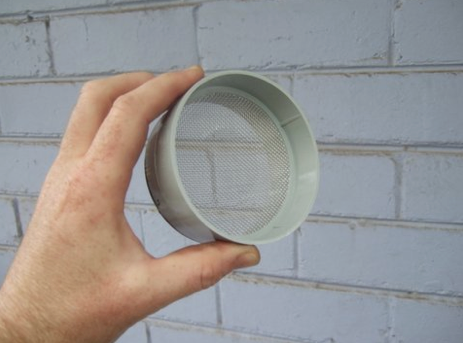
Cut tight fitting hole and silicon in.
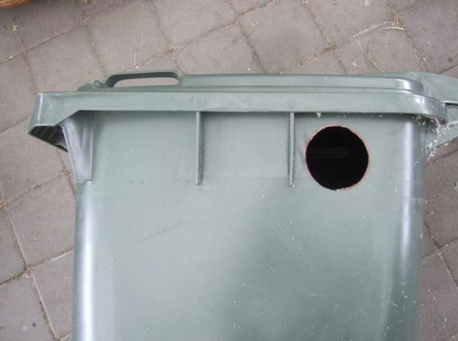

You now need to bolt some ag pipe (pipe with holes in it) to the back corner of the bin. This allows air to get to the bottom of the bin, even as it gets full.
Now for the top. Get some thick plywood 18mm+ and cut a square that covers whole bin. Place toilet seat in appropriate position and trace out inside of toilet seat. Cut out.

Screw in plywood to bins, then bolt in toilet seat to plywood with the bolts that come with a toilet seat. You will also see that I’ve added a screw to the front of the toilet set to keep it sitting flat. (Depending on the type of toilet seat you use, there may be a gap at the back of the lid that you’ll need to fill in to keep flies out. You could use some of the off cuts of the plywood for example).
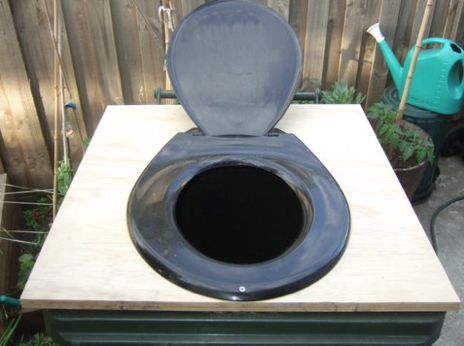
And you’re done. Fit for the Queen’s bottom.
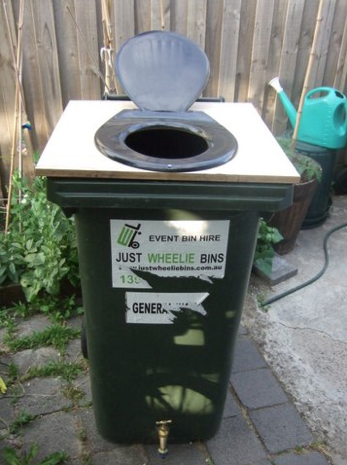
I made four 240l toilets and two 120l versions:

A similar wheelie bin system to this was used in Christchurch after the earthquakes, and is also used by the fine folks at Milkwood Permaculture too.
For other examples of alternative technology that I’ve written about, see my posts on solar ovens (here), my solar shower bag (here) my post-electric washing machine (here), and my non-electric fridge (here).


Ingenious and practical. Just one question… Does it need a step ladder?
Good question. I forgot to mention that you need to place a step of some variety to make it more easily accessible. I’ve used a variety of things, including pallets, railway sleepers, and tree stumps.
I think you should secure the plywood top to the inside so that you can use the wheelie bins existing lid which will be more effective at keeping flies out.
Also, you’d need some aggragate material, (blue metal?) around your ag pipe to prevent it clogging up Maybe even adding a length of PVC pipe as a sleeve. Another pipe extending up into the air, preferably black so that it heats up, would improve circulation and vent off any of the possibly nonexistent fumes 🙂
I’d also strongly suggest that if you started off with a layer of compost and some compost worms it’d improve the system no end.
But great stuff, gonna try it. Arrived via The Conversation so I might repeat this post there. Thanks.