
Grow Your Own Oyster Mushrooms on Straw
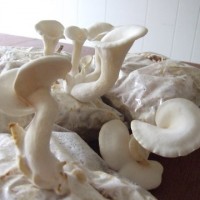
I’ve been experimenting recently with growing my own oyster mushrooms, and as you can see from the photos, I’ve met with some success. I was motivated to explore mushroom cultivation partly because I’m a vegetarian and want to produce my own high-protein alternatives to meat; but I was also interested in using so-called ‘dead space’ to grow food (either inside or down the shady side of the house). Oyster mushrooms tick both these boxes, and they are also ridiculously tasty.
Not only that, oyster mushrooms are extremely expensive when purchased from a supermarket, so it makes sense to grow them yourself. Currently in Melbourne they are going for $34 per kilo.
I’m no mushroom-growing expert, so do your own research, but below I’ve outlined how I’ve successfully grown my own oyster mushrooms on straw. It’s surprisingly easy, although you do need to take appropriate precautions to make sure you are growing the right mushrooms and in a hygienically safe way. Apparently white oyster mushrooms are the easiest variety to grow, which is why I started with them.
What you need:
Straw (I used pea-straw successfully but I’m told wheat straw is better)
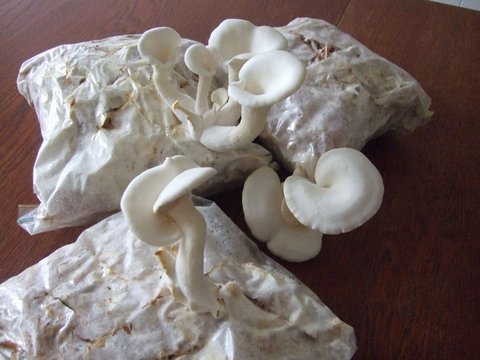
Robust plastic bags, medium or large size (which can be reused)
Oyster mushroom spawn (which I got from CERES in Melbourne and are also available here). You may need to find your local supplier.
Spray bottle and water
My 10-Step Method:
(1) Before you begin, wash your hands and clean all your surfaces well. It’s very important to be hygienic when cultivating mushrooms, as you do not want to grow the wrong types of fungi! Good mushrooms are really good; bad mushrooms are really bad. Fortunately, oysters mushrooms are very distinctive.
(2) Once you’ve got all the materials, the first thing you need to do is pasteurise the straw. From my research online, I discovered that this essentially means heating the straw in water to around 70-75 degrees (Celsius) and holding it at that temperature for around 45-60 minutes. I used a large Fowlers cooking pot. Pasteurisation kills the bad bacteria but leaves the good bacteria. Before you put the straw in the pot, most websites recommend that the straw is cut it up into small pieces around 1 to 3 inches in length. (To be honest, I didn’t cut up my straw, and I still grew mushrooms, but perhaps if I had cut it up my production might have been greater – further experimenting required.)
(3) Once you’ve pasteurised the straw, take it out of the heating pot with tongs and let it sit in a clean tub while it cools down. Be careful as you’re dealing with a lot of hot water and the pot will be heavy. It’s important you don’t put the mushroom spawn into the straw until the straw is at room temperature otherwise you will kill the spawn.
(4) When the straw has cooled down, pack your robust plastic bags with straw quite tightly, and then distribute some of the mushroom spawn throughout the straw. I put about three or four pieces of spawn-covered dowel in each bag, but perhaps one would have been fine (further experimenting required). The straw should not be dripping wet, but it should still be damp from the pasteurisation.
(5) At this stage, sterilise a skewer or a nail (by pouring boiling water over it) and jab holes in the bags every 3 inches or so. This let’s some air in, but not too much.
(6) You now have to find a home for you mushrooms. Keep them out of direct sunlight. They like some indirect light and I am told they like it best at around 15-20 degrees Celsius. (It’s been considerably warmer than that in Melbourne over the last two months, and mine have grown very well, but again perhaps the yields would have been greater had the temperature been cooler). More experimenting required. I kept my bags inside to minimise the risk of contamination.
(7) Now you wait while the mushrooms spawn develops into mycelium and beginning taking over the entire bag. Mycelium looks a bit like white furry cobwebs, and you should start seeing it develop in the first couple of weeks. It’s important that your bags of straw stay moist, but not dripping wet. I found that the water from the pasteurisation was sufficient to keep the straw suitably moist without needing to spray with water.
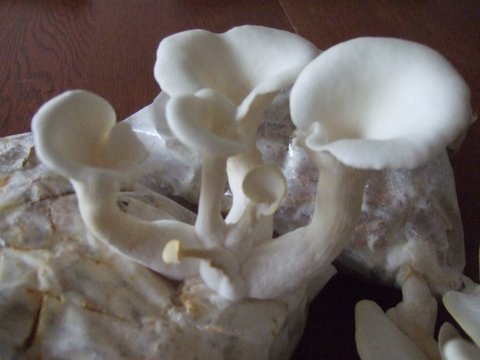
(8) After a number of weeks (depending on the size of your bags) the mycelium should have spread across the entire bag of straw. It is at this stage (which for me was about 5 weeks later) your mushrooms should start forming. I cut some slightly larger holes in the bag, although I’m not sure this was necessary. The mushrooms will decide that they want to grow out of one or more of the holes you’ve created, and they’ll usually grow in one or two clusters.
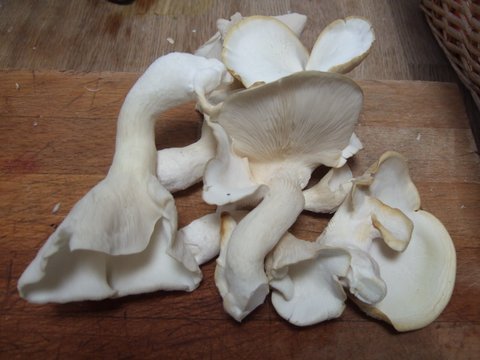
(9) Now comes the fun part. The mushrooms essentially double in size every day, so within a week or so you should have good-sized oyster mushrooms. Mist them with water two or three times a day over this period – again, not so they are dripping, just so they are moist. The mushrooms should be harvested while their rims are still curled over a little and pointing downwards. If their rims seem to be turning upward, it’s probably time to harvest.
(10) Harvest and eat. To harvest the mushrooms give them a twist at the base. This ensures that you leave the very bottom of the mushroom still in bag. You want to leave that part in the bag as it is needed for the subsequent flushes of mushrooms. If you keep the mushrooms moist and in suitable conditions, you should get three or four flushes of mushrooms, although I’m told the first and second flushes are the most productive. I’m currently harvesting my second flush. When your bags stop producing, the straw can be used as mulch for the garden. (Alternatively, my understanding is that you can distribute some of your straw into new bags of fresh straw and the growing process begins again).
If there are any mushroom experts out there, do let me know if you have any advice, and if any of you decide to begin cultivating your own mushrooms, do let me know how you get on. I’m going to keep experimenting in the hope of developing the easiest and most productive methods.
That’s all for now. I’ve got to go cook me some shrooms.
See Entropia: Life Beyond Industrial Civilisation, for one vision of a ‘simple living’ utopia.


Hello friends,
I live in Phnom Penh, Cambodoia and I just happened to visit my friends mushroom “farm” last month (although they are extremely poor people and are growing on land that they do not own and they are growing on a small scale.
Here is what they do: first they burn the grass in whatever patch they want to grow mushrooms to prepare the ground. Then they plant the mushrooms (I didn’t watch that phase).
Then they stack handfuls of hay or straw to provide shade for their mushrooms in a tent fashion with the straw being about 2 feet long or 1 meter (think of stacking wood for a teepee style fire.
They water the mushrooms as needed to have the right amount of moisture.
They are growing mushrooms in an open field without any natural shade and have been doing it for several decades. The soil isn’t anything special either. They sell there mushrooms at the market.
Just attended a seminar on growing oyster mushrooms. Pretty much agreed with what you’re doing. Recommended barley straw as the best. Isn’t the easiest to find though.
Thank you for this interesting post. It makes me want to grow them.
I am curious about your statement that pasteurising does not kill good bacteria. We are looking at eating raw and/or fermented foods which must be unpasteurized, right? I thought I was getting probiotics from sauerkraut only to read that it is pasteurised and dead. Most of the research I see says that pasteurisation does kill beneficial bacteria. I’d love to find out that it doesn’t. Thanks for your help.
found this very helpfull to start myself i also travelled to ceres to get the grow kit. And was shattered to find that when i was doing shopping at the footscray market i found 3 species of fresh oyster mushroom along with a few other fresh mushrooms i had never seen before all under $5 for at least 150 grams more than enough to start a mycelium run so if ur looking for the cheapest freshest mushrooms its a little european supermarket in the main market across the road from footscray station i saw white,king,pearl oyster,shimeji and a couple others i cant remember the name of. Exciting and dissapointing as i spent $23 and a couple hrs transport to ceres when i could of whent 15 min down the road and spent $2.50. Thank u for posting these instructions found them the most straight forward in my research and recently started myself waiting for the mycelium to take over i got about 6 different containers due to impatience.
Hi Samuel,
I am Ratha, from Cambodia. I am growing oyster mushroom,I have 20000 – 25000bags of oyster mushroom in a mushroom shelter I made in my own land. I do it the same process as you do, but I use haystack or debris of rubber plant.
Thank you Samuel for having posted what you have learned from your oyster mushroom growing. It is a nice recording and useful for learning.
Cheers,
Ratha
Thank you for the resource full post.I have tried two times with different straw. firstly with the rice straw, and in the second I cultivated in the lemon grass, in which the production was deteriorated by many fold.
Thank you for your share.
Lungten Jamtsho
Country :
Bhutan
I have been growing oyster mushrooms in Zambia for three years for home consumption.for any enquiry my mobile number is +260 0965342004. If any club wants to be helped practically they can write to me : Mboozi Savoy,Chikankata High School p/bag s-2.Mazabuka Zambia
[…] Visit Grow Your Own Oyster Mushrooms on Straw | The Simplicity Collective Company Name: MASI PRODUCTS Exporter and supplier of Oyster Mushroom Address NO 60, METTU STREET, […]
I bought my first bag today and have been doing some research, hence I’m going to try adding coffee grounds along the way to see if it is possible to keep them growing for a longer period of time.
It is interesting I have decided to start growing because of your advice.
Thank you!
No bacteria will survive a correct pasteurization procedure.
Thanks for this informative article. In India people grow milky mushrooms (another variety) using coco peat (compressed coconut fiber) as the substrate.Can anyone clarify wheather cocopeat is a good substrate for oyster mushrooms also?
Hi, regarding step 10, re-using the spent straw which has finished producing mushroom, can this be re-used in conjunction with new straw alone or does it need some new spawn? If so, what would be the use of adding the old straw to the new straw apart from providing more straw?
Thanks in advance. Love this article.
Great article. I also use the bagged technique,and experiment with different growing media. You mentioned pasteurization kills bad bacteria and leaves good bacteria… That’s not necessarily true. Pasteurization is meant to kill ALL bacteria, good or bad, for a ‘sterile’ media. Mushroom media is not like soil where you want a healthy amount of beneficial bacteria. You are basically clearing the slate for Oyster mycellium to out compete anything else, and avoid contaminants. Still an excellent article. 🙂
hie there.I am from Zimbabwe. I started on my first exciting journey of oyster shrooms production in september, after perforating my bags to allow for pinning a few weeks later, they started to have orange, green, red and black moulds. I had followed exactly the same procedure as yours. For sterilisation, i used a detergent with sodium hypochlorite. Of the 36 bags i had, i was only left with 14. They are only a few that are fruiting well, the others produce shrivelled fruit with brown edges. If you may have some advice please do share. Thank you for the article by the way.
Great job on the grow! I’m growing blue oyster mushrooms right now.
Latest post from Peter…Shiitake Powder Pasta
Pasteurization does not kill the thermophile bacteria. The trick is to ensure the temperature of the water never exceeds 160 degrees. Sterilization at high pressure, on the other hand, kills everything. The previous poster that said “no bacteria can survive proper pasteurization” is incorrect and confused. Look up thermophiles, and also look up the definition of pasteurization and sterilization. Mushroom grain spawn is typically prepared with sterilization and injecting spores into the grain jar under sterile conditions, while the substrate is pasteurized and the grain spawn is mixed in. The idea is that healthy mycelium can take over the substrate quickly when it is pasteurized because it doesn’t have to fight with other molds and bacteria for resources. The thermophiles help keep the nasty bacteria and molds at bay long enough for the mycellium to fully colonize and then be strong enough to fight its own battles. The green trichoderma is a common enemy for mushroom growing, and will quickly overtake unpasteurized substrate. Oysters can be strong enough to overtake trichoderma at times but it can quickly become a losing battle. The reason we don’t sterilize the substrate is because it would require sterile growing conditions that are hard to maintain when mixing grain spawn with substrate, and contaminants will not have any thermophile bacteria to fight so they will be able to take over more quickly than the mycellium.
Good day. I’m attempting my first oyster grow and need some help.
Four bags have been incubating for 4 weeks – nice mycelium growth thruout the bags. Temp in bags range from 72 to 80F with nice moisture inside but I’m using space heater to heat the room. I have no aggragations around the holes in bag. Do I need to get room humidity up. Can I force fruit by dropping temp, high humidity, increase air flow and add light.
Any advice is appreciated.
Geo.
Great write-up: Trying out my first batch, Question about STEP 6, “They like some indirect light and I am told they like it best at around 15-20 degrees Celsius”
But some say it should be complete dark during this stage. Which one should I follow? any recommendations?
Thanks
Growing oyster mushrooms has been very rewarding and exciting especially when some bundles of substrate and mycelium stashed away and forgotten had fruited pushing containers like yogurt lids right off. ( my family on the other hand have gotten kind of creeped out by these strange happenings ) hahaha
I LOVE creating batches of spawn in used ziplock bags. I suck most of the air out and seal it good. I like “take out” tubs when trying something new so I can see through them but yogurt and smaller are good too, like KFC mashed potato and coleslaw containers. I even use the chicken tub, and ice cream tubs, 7/11 domed Slurpee cups have been great too. Aseptic drink boxes like rice milk can be cleaned and used immediately. They can be folded back closed. Blocking light But almost anything that didn’t have a cover like those black microwave trays frozen entree come in, or glass jars I cover with plastic wrap. Keep dark in old shipping boxes or I save chip bags , aluminum foil, dark fabrics that little or no light pass through, then placed on the top shelf near the ceiling because heat rises.
Can you tell yet I like to repurpose things?
Some of the materials I found work well are small twigs to 1 inch diameter pieces of oak, birch, rose. ( I figure anything that isn’t known like pine/conifer to be ??antimicrobial?? it should be tried !!!
Cardboard usually the center corrugated portion of pizza boxes ( it absorbs water best and mycelium can grow through it fast ). I’ve gone collecting seed heads from weeds, and now that the summer has dried them to straw I try to catch people weed wacking for the largest quantities. Oh and the local elementary school serves lunch on some kind of paper mâché trays. Stacked and punch holes in them hammering with nails or stabbing through will let mycelium pass much faster through.
I don’t like coffee grinds much but in quantities almost like dusting directly on healthy fluffy mycelium. And like it only because it is great for crumbling as spawn into fresh substrate.
Something I thought I would describe is that point where the mycelium is ready to fruit. Since not everybody would be starting from colonized kit or seed, only knowing what fluffy mycelium looks like you can tell when it is gotten denser. Parts can still be fluffy but if enough of an area starts to dry somewhat it get these little pimple like bumps and then a tiny little cluster/s like cauliflower bits. Image searches are fun.
Ph levels , I haven’t played with those yet but I am wondering since I do have a cheap digital soil (probe) meter if the Ph is different after some little fungus/soil gnat larvae have pooped on some of the cardboard which they’ve eaten the mycelium and it DOESNT seem to want to grow back over the cardboard.
Misc info, I cut a hole in the lid of some cold cut meat container and then hot glue’d part of a face mask from the hospital but that dried out the mycelium to fast and I put some Saran Wrap under the lid to block any air flow.
These are some of the more unusual containers I tried fruiting in.
*Keuerig coffee pod
*Frozen juice concentrate can. With an exacto blade, scratched the inside plastic so it could work through to the cardboard
*plastic gum dispenser
*orange plastic medicine bottles
*slurpee and Starbucks cups
*wide bubble tea straws ( haven’t tried the tapioca pearls as substrate though )
I better quit writing, falling asleep 🙂
Thank you Samuel for sharing your ‘experiment’
You gave a great deal of information which I found extremely helpful as I am about to attempt to grow my own oyster mushrooms.
Kind Regards
Lorraine